icubesire

revenuehits

Search in Desigs Guru

Thursday, March 18, 2010

mirror effect

In a previous Photoshop photo effects tutorial, we learned how to create a simple mirror effect with an image by flipping the right side of the photo horizontally to create a reflection of the left side. In this tutorial, we'll take the same general idea and go much further with it, creating interesting effects, designs and patterns by doing nothing more than flipping, rotating and mirroring the same image over and over again! We'll also experiment with Photoshop's layer blend modes to see how different blend modes can dramatically change our results!
You can use any photo you like for this tutorial, but the effect tends to work best if you start with an image that already contains some sort of interesting pattern or design. I'm going to use this photo of trees. It's the same image I used in the Adding Sunlight Through The Trees tutorial but it should work great thanks to all the tree branches heading off in different directions:
A photo of a tree. Image licensed from iStockphoto by Photoshop 
Essentials.com.
The original image.
Here's just one example of the sort of design or pattern we can create from it in just a few easy steps. Every photo you try this with will give you different results:
The final pattern design created from a single image in Photoshop.
 Image © 2010 Photoshop Essentials.com.
One possible design. Your results will depend on your photo and the blend modes you choose.
Important Note: Make sure you work on a copy of your image, not the original, when creating this effect since there won't be any way to get the original back later if you need it. To create a copy, go up to the File menu at the top of the screen and choose Save As, then save the image under a different name.
I'll be using Photoshop CS4 in this tutorial but any version should work. Let's get started!

Step 1: Switch To Full Screen Mode With Menu Bar

Before we begin, let's make a quick change to the way Photoshop is displaying our image so it will be easier to see what we're doing as we make our way through the steps. By default, Photoshop displays images in floating document windows, which is usually fine. In this case though, since we're going to be increasing our canvas size quite a bit, it will be easier for us to work in one of Photoshop's full screen modes. Once you've opened the image you want to work with, go up to the View menu at the top of the screen, choose Screen Mode, and then choose Full Screen Mode With Menu Bar:
Photoshop screen modes. Image © 2010 Photoshop Essentials.com.
Switching to Full Screen Mode With Menu Bar will make it easier to see what we're doing.
You can also cycle through all of Photoshop's screen modes by repeatedly pressing the letter F on your keyboard. Full Screen Mode With Menu Bar will switch Photoshop to full screen, displaying a gray pasteboard area around your photo (the other Full Screen Mode will do the same thing but it hides the Menu Bar, as well as all of your palettes). To get back to the document window mode at any time, go back up to the View menu, choose Screen Mode, and then choose Standard Screen Mode, or simply press the letter F a couple of times.

Step 2: Crop Away Any Unwanted Areas Of The Photo

To begin, let's remove any areas of our image that we don't really need for the effect. In my case, I want to keep the trees themselves but the ground below them doesn't look very interesting and probably won't add anything to the final design or pattern, so I'll crop the ground away. Do do that, I'll select Photoshop's Crop Tool from the Tools panel. I could also press the letter C on my keyboard to select it with the shortcut:
Selecting the Crop Tool in Photoshop. Image © 2010 Photoshop 
Essentials.com.
Select the Crop Tool.
With the Crop Tool selected, click and drag a cropping border around the area of the image you want to keep. In my case, I'll click in the top left corner of the photo to add a starting point, then while holding my mouse button down, I'll drag down and to the right to a spot an inch or so above the bottom right corner of the image. This will keep the trees inside the crop border, while everything along the bottom of the image will be cropped away:
Cropping an image in Photoshop. Image © 2010 Photoshop 
Essentials.com.
Click and drag a cropping border around the area you want to keep.
Press Enter (Win) / Return (Mac) when you're done to crop away the unwanted areas. Here's my image now with the ground along the bottom removed:
The image after it has been cropped in Photoshop. Image © 2010 
Photoshop Essentials.com.
The remaining part of the image should create some interesting designs.

Step 3: Duplicate The Background Layer

If we look in our Layers palette, we see that we currently have only one layer, named Background. This is the layer our image is sitting on:
The Background layer in Photoshop. Image © 2010 Photoshop 
Essentials.com.
Our Photoshop document contains just one layer at the moment.
We need to create a copy of this layer. To do that, go up to the Layer menu at the top of the screen, choose New, then choose Layer via Copy. Or, for a faster way to duplicate a layer, press the keyboard shortcut Ctrl+J (Win) / Command+J (Mac):
The New Layer via Copy command in Photoshop. Image © 2010 
Photoshop Essentials.com.
Go to Layer > New > Layer via Copy, or press Ctrl+J (Win) / Command+J (Mac).
Either way tells Photoshop to make a copy of the layer, and if we look again in the Layers palette, we see that sure enough, a new layer, which Photoshop has automatically named "Layer 1", has been added above the original:
A copy of the layer appears in the Layers palette in Photoshop. 
Image © 2010 Photoshop Essentials.com.
The new layer contains its own copy of the photo for us to work with.

Step 4: Double The Width Of The Canvas

Go up to the Image menu at the top of the screen and choose Canvas Size:
The Canvas Size command in Photoshop. Image © 2010 Photoshop 
Essentials.com.
Go to Image > Canvas Size.
This opens Photoshop's Canvas Size dialog box which we can use to add more canvas space around our photo. We need to double the current width of our canvas, and we want all of the extra canvas space to appear on the right side of our image. To do that, set the Width value to 200 percent and the Height to 100 percent (which will leave the height of the canvas at its current size). To force the extra canvas space to the right side of the photo, click on the left middle square in the Anchor grid:
The Canvas Size dialog box in Photoshop. Image © 2010 Photoshop 
Essentials.com.
Enter 200 percent for the Width, 100 percent for the Height, and click on the left middle square in the Anchor grid.
Click OK when you're done to close out of the dialog box. Photoshop doubles the width of the canvas, adding all of the extra space on the right side of the photo. By default, Photoshop fills the extra canvas space with white:
Extra canvas space now appears on the right side of the photo. 
Image © 2010 Photoshop Essentials.com.
The extra canvas space appears on the right side of the photo.

Chapter 1: Getting started

If you haven’t installed your new software, begin by reading some information on installation and other preliminaries.

Before you begin working with your software, take a few moments to read an overview of Adobe Help and of the many resources available to users. You have access to instructional videos, plug-ins, templates, user communities, seminars, tutorials, RSS feeds, and much more.
Installation
Requirements      
❖ To review complete system requirements and recommendations for your Adobe® software, see the Read Me file
on the installation DVD.
Install the software    Photoshop CS4: The Missing Manual
1 Close any other Adobe applications open on your computer.
2 Insert the installation disc into your DVD drive, and follow the on-screen instructions.
Note: For more information, see the Read Me file on the installation DVD.
Activate the software
If you have a single-user retail license for your Adobe software, you will be asked to activate your software; this is a simple, anonymous process that you must complete within 30 days of starting the software.
For more information on product activation, see the Read Me file on your installation DVD, or visit the Adobe website at www.adobe.com/go/activation.
1 If the Activation dialog box isn’t already open, choose Help > Activate. 
2 Follow the on-screen instructions.
Note: If you want to install the software on a different computer, you must first deactivate it on your computer. Choose
Help > Deactivate.
Register
Register your product to receive complimentary installation support, notifications of updates, and other services.
❖ To register, follow the on-screen instructions in the Registration dialog box, which appears after you install and
activate the software.
If you postpone registration, you can register at any time by choosing Help > Registration.
PHOTOSHOP CS3
User Guide
2
Read Me
The installation DVD contains the Read Me file for your software. (This file is also copied to the application folder during product installation.) Open the file to read important information about the following topics:
• System requirements
• Installation (including uninstalling the software)
• Activation and registration
• Font installation
• Troubleshooting
• Customer support
• Legal notices
Adobe Help
Adobe Help resources
Documentation for your Adobe software is available in a variety of formats.
In-product and LiveDocs Help
Photoshop CS4 Digital Classroom
In-product Help provides access to all documentation and instructional content available at the time the software ships. It is available through the Help menu in your Adobe software.
LiveDocs Help includes all the content from in-product Help, plus updates and links to additional instructional content available on the web. For some products, you can also add comments to the topics in LiveDocs Help. Find LiveDocs Help for your product in the Adobe Help Resource Center, at www.adobe.com/go/documentation.


Tuesday, March 16, 2010

The HelpSoldier of LoveKindle Wireless Reading Device (6" Display, Global Wireless, Latest Generation)The Twilight Saga: New Moon (Two-Disc Special Edition)Food Rules: An Eater's Manual

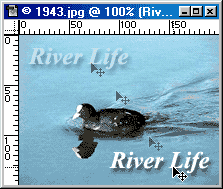
1. Moving layers with the Control key

You don't need to activate the Move tool to move layers around. Simply hold down theControl key (for Windows users) or the Command key (Mac users) and click and drag on your layer with the mouse:
Move with the Control key

2. Hiding the Palettes with the Tab key

Are the palettes getting in the way? You can hide them temporarily just by hitting the Tabkey. To bring them back, press the Tab key again.

3. Selecting all pixels on a layer

To select all the opaque pixels on a layer (as opposed to using "Select All", which selects the whole layer), hold down the Control key (Windows) or Command key (Mac), and click on the layer in the Layers Palette:
Select pixels on a layer

4. Double-click to open documents

To open a document in Photoshop, you don't need to reach for the File > Open menu option or even press Control+O - you can just double-click on the grey Photoshop window background!

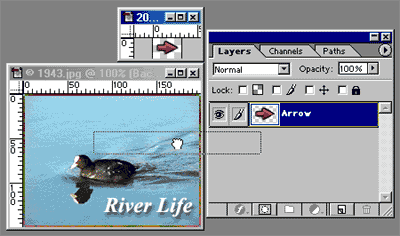
5. Dragging layers between documents

You can copy a layer from one document to another by clicking on it in the Layers palette and dragging it across to the second document window:
Drag layers between documents

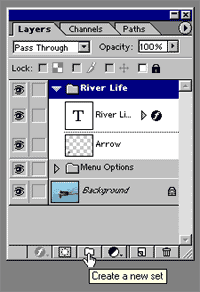
6. Use Layer Sets

If you're using Photoshop 6 or higher, check out Layer Sets. These let you organize your layers into folders - very useful if you have lots of layers in a document! To create a new Layer Set, click on the folder icon at the bottom of the Layers palette, then drag layers on top of a layer set to add them to the set:
Layer sets

7. Full screen mode

If you're working on a large image such as a photo, you can maximize the available editing area by pressing the F key to toggle between a full screen mode with and without menu bar, and normal editing mode. If you also use tip number 2 above, and the tool shortcut keys, you can do a lot of your work without a menu or palette in sight!

8. Nudging

You can get precise control over the position of your layers by using the arrow keys on the keyboard to nudge the layer around. Hold down the Control key (Windows) or the Commandkey (Mac) and use the updownleft and right arrows to move the layer 1 pixel at a time. To move the layer by 10 pixels at a time, hold down the Shift key as well.

9. Choosing colours quickly

Press I to bring up the Eyedropper tool, then click on a colour in your image to make that colour the foreground colour. Press the ALT key and click to make the colour the background colour instead.
You can also press the D key to reset the foreground and background colours to the default (black and white), and the X key to swap the foreground and background colours.

10. Keeping to straight lines

You can often constrain movement of the mouse to the nearest 45-degree or 90-degree angle by holding down the Shift key while you click and drag with the mouse. This works on tools such as the Paintbrush ToolLine Tool and Move Tool. Great for drawing straight lines!

photoshop history


Home Page
How two brothers created one of the first "killer apps" more than 10 years ago.
Photoshop toolbar from version 1.07
Photoshop toolbar from version 2.51
Photoshop toolbar from version 5.5
Top of Page.

From Darkroom to Desktop—How Photoshop Came to Light

by Derrick Story
Feb. 18, 2000


Brief Photoshop Timeline 

1987 Thomas Knoll begins writing graphics subroutines on a Mac Plus.

1987 Thomas teams up with his brother John and combines these subroutines into an app. called "Display."

1988 Refined version of Display becomes "ImagePro."

1989 BarneyScan licenses the application to bundle with their slide scanner. About 200 copies are shipped.

1989 Adobe strikes a deal to license what becomes known as Photoshop. They begin 10 months of product development.

1990 Photoshop 1.0 ships in February.

1990 Version 2.0, code name "Fast Eddy," ships in the fall.

1993 Version 2.5.1 is released. One of the first apps to run native on a PowerPC chip. Also first release of Windows version (April, 93).

1994 Version 3.0 ships with the "Layers" capability.

1996 Version 4.0 ships. Controversial key commands are changed.

1998 Version 5.0, which includes the "History"palette, ships.

1999 Version 5.5 ships: the first true "web ready" version of the app.

Ten years ago this month, Adobe shipped Photoshop 1.0. "Has it really been that long?"
It has.
The story of one of the original "killer apps" begins in Ann Arbor, Michigan (USA) with a college professor named Glenn Knoll. Glenn was a photo enthusiast who maintained a darkroom in the family basement. He was also a technology aficionado intrigued by the emergence of the personal computer. His two sons, Thomas and John, inherited their father's inquisitive nature. And the vision for future greatness began with their exposure to Glenn's basement darkroom and with the Apple II Plus that he brought home for research projects.
"Photography was a hobby of mine in high school," explained Thomas in an interview for the Michigan Engineer. "In dad's darkroom, I learned how to make black-and-white and color prints, how to balance color and contrast."
While Thomas learned about image manipulation in the basement darkroom, John was attracted to the odd-shaped box known as a personal computer that his dad had brought home. "The first real computer I ever actually sat down and used was in 1978. I was a 16-year-old high school student when my dad got an Apple II Plus with 64k of RAM," John recalls during an interview for his AppleMastersbiography.
"Another memory that is really fixed in my mind" John adds, "was in 1984 when I picked up a copy of Time magazine that had a little article about the Macintosh, and I thought, wow, look at this thing!" A couple of months later Mr. Knoll had purchased one of the first Macs available on the open market.
Even though Thomas loved hands-on darkroom work, he too had a keen interest in computers and programming. In 1987 he purchased an Apple Macintosh Plus to help him with his Ph.D. work on the "processing of digital images." Much to his disappointment, the Mac couldn't display gray-scale levels in his images. To solve that problem, Thomas wrote a subroutine to simulate the gray-scale effect.
Thomas's work led to more subroutines and chunks of image programming. These bits of computer magic caught John's attention during a visit he paid to Ann Arbor while on vacation from his job at Industrial Light and Magic (ILM) in Marin, California. "The work Thomas was doing had to do with how a computer could recognize a predefined object in a digitized picture," John recalls in an interview with Terrence Masson for the book, "CG 101: A Computer Graphics Industry Reference".
"Image processing is the fundamental basis of any of that kind of work, and Tom had written a bunch of image processing tools," John adds. "As Tom showed me his work, it struck me how similar it was to the image processing tools on the Pixar [image computer John had just seen a graphics demo on at ILM]."
"There were a bunch of command line driven shell tools much like the Unix C shell command line interface of the Pixar." Shortly there after, John and Thomas pulled these pieces of code together and Thomas built an amazing little application called "Display."

John Knoll.
Photo by Jeff Schewe.
"I was delighted," John said, "but I started asking for more. What if Display could save images in other formats so I could print them in another program? I used Display to open a couple of sample images that I got from the ILM computer graphics department, but they looked too dark on my screen—suddenly I needed gamma correction tools too." John's requests distracted Thomas from his thesis work, but he too was intrigued by the possibilities of image editing on a personal computer.

This cycle of refinement continued over a period of months and led to an improved version of the application that became "ImagePro" in 1988. At this point John began suggesting to Thomas that they turn ImagePro into a commercial application.

Thomas Knoll.
Photo by Jeff Schewe.
"My fellowship money had run out and my wife was expecting our first child," Thomas explained during the Michigan Engineer interview. "I was feeling pressure to finish what I was doing and find a job."

In early 1988, Thomas decided to give himself six more months to finish a beta version of ImagePro and let John shop it around Silicon Valley. Interestingly enough, many of the Silicon Valley companies that John approached were cool to the idea of their image manipulation program. SuperMac turned it down because they didn't understand how ImagePro could complement their already popular product, PixelPaint.
But one company, BarneyScan, did show some interest. They offered to bundle (on a short term basis) what was now called "Photoshop" with their slide scanner. A total of about 200 copies of Photoshop were shipped with their scanners, according to Jeff Schewe in his article, "Photoshop: a Decade of Image-Editing Excellence."

The original application icons designed by John Knoll.

In September 1988, the Knoll brothers' luck changed. John presented a demo to Adobe's internal creative team, and they loved the product. A license agreement was struck soon after, and Photoshop 1.0 was shipped in February 1990 after 10 months of development.
Thomas has remained involved with the project all along. He never did have time to finish his thesis. John has continued his career at ILM, serving as visual effects supervisor on projects such as "Mission Impossible" (1996), "Star Trek: First Contact" (1996), and "Star Wars: Episode I - The Phantom Menace" (1999). Glenn Knoll is still working as a professor for the College of Engineering at the University of Michigan. But he now uses a Powerbook G3 at home. And the darkroom in the basement has since been replaced by, yes, you guessed it, Photoshop.


Special thanks to Kim Scott for the terrific banner graphic, to Jeff Schewe for the sharp looking photos of the Knoll brothers, to Glenn Knoll for helping me get it right, and to Erin McCabe for pulling together the toolbar and old icon graphics.

Thursday, March 11, 2010

Create a wayne roooney football / soccer desktop wallpaper

a Wayne Rooney Football / Soccer Desktop Wallpaper

Wayne Rooney is one of the most prolific strikers in the world right now, and in this tutorial I will be showing you how to use a variety of effects to turn an image of him, into a stunning football / soccer themed desktop wallpaper, whilst catering to the needs of several common screen resolutions.

Tutorial Details

Program: Photoshop
Version: CS or Higher
Estimated Completion Time: 2 Hours
Final Image Preview: Click to Enlarge

Downloads Required:
Stock Images: WayneRooney
Fonts: DareDevil, Batman Forever
Brushes: Clouds, Splatter

Optional Downloads:
PSD File: rooney_tut.psd

See Me Do This:
Video:
http://www.youtube.com/watch?v=1C1RhKoKWVE

Before we start I would just like to point out that I do not support Manchester United. I am a die hard Newcastle United Supporter, and even with their fall to the Coca-Cola Championship, they will always be my team. But for the purpose of the tutorial I thought more people would be interested in Wayne Rooney than Andy Carroll. So… with my Geordie Faithful rant out the way, let us begin… =)

Step 1

Ok, first we need a photograph of a football player. I believe SportGFX.com to be one of the best sites around for free high resolution footballer images. So a huge thanks to them!

Go to SportsGFX’s football pictures forum, choose your country and your team and take your time looking for an image you like.

I chose this one.

Step 2

With your image open in Photoshop, double Click the Background Layer then click ok to unlock it. Rename the layer Rooney. Take the Pen Tool (P) and draw around your subject. Note: When using the Pen Tool zoom right in and use many anchor points to get a cleaner finish when we remove the background. If you rush this step you compromise the overall quality of the final image.

When done, use the Convert Path to Selection button in the Paths Window (Window > Paths).

Choose Select > Refine Edge. Use minimal settings, if you took your time with the Pen Tool you will get a nice clean finish. Do not use bad habits. A common bad habit is to use the Feather Tool to try and hide a rushed selection. It will look bad, don’t do it. Rome wasn’t built in a day.

Choose Layer > Layer Mask > Reveal Selection. This will leave us with Wayne on a blank canvass.

Step 3

Choose Image > Adjustments > Brightness/Contrast and just make the colours a bit more vibrant.

Step 4

Create a new layer and name it Background. Fill it with black and place it beneath the Rooney Layer.

Step 5

Duplicate the Rooney Layer. Name it Rooney Clouds and drag it below the Rooney Layer. Hide the Rooney Layer so that only the Rooney Clouds layer is visible. At the minute they both look the same so it can get a little confusing.

Choose Image > Adjustments > Desaturate.

Step 6

Un-hide the Rooney Layer. Use the Free Transform Tool (Cmd+T/Ctrl+T) to resize and reposition Wayne more in the centre.

Step 7

Next, create a new layer and name it Clouds Left and position it under the Rooney Layer. Download the Clouds Brushes and take the brush called Pincel Muestreado 6. Increase the brush size and drop it onto the layer using a single click and the colour White.

Choose Layer > Layer Mask > Reveal All and use a Soft Round Brush and the colour Black to erase the overlapping parts of the cloud.

Step 8

Create a new layer and name it “Clouds Right”. Repeat step 7 except use the brush Pincel Muestreado 8.

Step 9

Duplicate the Rooney Layer again. Name it Rooney Back Blur. Cmd-Click/Ctrl+Click the layer mask to highlight the outline of Wayne, then fill with White.

Choose Select > Deselect to cancel the outline selection. Next, choose Filter > Blur > Radial Blur. Set the Amount to 100, the Method to Zoom and the Quality to Best.

Cmd-Click/Right-Click the layer and choose Duplicate. Click OK. Hold down Shift and select both of the Blur Layers, Cmd-Click/Right-Click and choose Merge Layers. Then position the Layer below the Rooney Layer.

Step 10

Open your stock image up again in a new Photoshop document. Choose the Elliptical Marquee Tool (M) and draw a circle around the ball. Choose Edit > Copy and return to the Desktop Wallpaper document. Choose Edit Paste to paste the ball in. Name the layar Ball.

Repeate the previous step for Duplicating and Blurring and name the Blur Layer “Ball Back Blur”.

Step 11

Create a new layer and call it Spatter. Download the Splatter Brush Pack then choose the Clone Stamp Tool (S). Choose one of the Splatter Brushes. You want one that has lots of individual droplets. Choose the Rooney Layer, hold down Alt and choose somewhere near his right shoulder, (I have marked my target are in green) then return to your Spatter Layer and drop the clone stamp tool a few times around that area. You can remove the ‘Squareness’ by simply erasing some of the droplets with the Eraser Tool (E).

Repeat this a few times for different areas (including the ball). The target is set by whatever layer is selected. So be sure to select the right layer for your target, and make sure you drop the clone stamp tool on the Spatter Layer only. Drag the layer under the Ball Layer.

Step 12

Duplicate the Spatter Layer. Name it Spatter Back Blur 1. Choose Filter > Blur > Radial Blur. Again set the Amount to 100, the Method to Zoom and the quality to Best.

Duplicate the Spatter Layer again and call it Spatter Back Blur 2. Repeat the Radial Blur, except this time make the Amount 20. Position both the Spatter Blur Layers beneath the Spatter Layer.

Step 13

Choose the Rooney Clouds layer and move Wayne into a more offset position. Choose a large soft brush and the colour Black. Then on the layer mask remove his legs and blend him into the clouds. Position the Rooney Clouds Layer above the Cloud Right Layer.

Step 14

Create a new layer above the Rooney Clouds Layer and name it Flag. Take the Pen Tool (P). Draw a curves shape off to the left of Wayne but overlapping his torso.

Choose the Convert Path to Selection Tool from the Paths Pallet. Fill the shape with white.

Choose the Pen Tool (P) again and draw a similar shape but on a smaller scale inside the existing one and fill it with Red.

Choose Layer > Layer Mask > Reveal All and choose the Rectangular Marquee Tool (M). Drag a rectangle over the left hand edge of the Shape. Then choose the Gradient Tool (G) and with a Black to Transparent Gradient selected draw in a gradient to fade out the edges of the flag.

Duplicate the Flag Layer and use the Free Transform Tool to Rotate and Position a flag on the other side.

Choose the Flag Copy Layer Cmd-Click/Right-Click and choose Merge Down. Make sure you Preserve the Mask. Use the Pen Tool (P) and draw a thin shape along the bottom edges of the flag and fill them with Black to give it a bit of depth. Note: Make sure you don’t have the Layer Mask selected when you fill with Black of you will simply delete some of your flag.

Step 15

Download this Image of the Manchester United Badge. I found this using Google Images with the key words “MUFC Logo”. Try to find a clean image with a decent size resolution.

Paste it into the document above the Rooney Layer and name the layer Badge. Because it is so clean we can simply use the magic wand tool to remove the background. Set the Tolerance to 50 and remove all things white and background like.

Resize and Reposition it using the Free Transform Tool (Cmd+T/Ctrl+T).

Choose Layer > Layer Style > Blending Options. Set the following Options.

Step 16

Download and install the Dare Devil Font. Type Wayne in Red and Rooney in White. Make them two separate layers then you can position them closer together for effect. You can Shift select both layers and choose Link Layers so they become one movable object if you wish.

Cmd-Click/Right-Click the Badge Layer and choose Copy Layer Style. Cmd-Click/Right-Click the two text layers and choose Paste Layer Style. This will add the effects we just created on the Badge Layer.

You might notice from the text I varied the lower and uppercase letters to make it look how I wanted.

Use the text tool to write the letters i and o. This makes our 10 as the DareDevil font does not contain any numbers. You can rename the layer to 10 to save confusion.

Choose Layer > Layer Style > Blending Options. Use the following settings.

Choose Layer > Layer Mask > Reveal All. Again add a gradient to fade the side of it like we did with the flag using a Grey and White Gradient. Position the layer above the Badge Layer.

Step 17

Next download and install the Batman Forever Font. I got the text by looking up Wayne Rooney on Wikipedia. You can make it up or get it from another source it doesn’t really matter. Obviously the idea is to write something Cool about the player though.

Set the same effects as previously except on the Outer Glow change the Size to 3 instead of 5.

Step 18

Next add the sponsors. I found all the sponsors on the official MUFC website and just Google Image searched each brand name, followed by the world Logo. eg Audi Logo.

Paste each one in and name the Layer appropriately. Then remove the background and Resize and Position it. You can add all the layers into a folder to make life easier if you wish.

Step 19

Now it is just a case of adding your mark to your wallpaper. Add it somewhere in the mix so that people can’t simply cut it off the edge and post it as their own. After all it is your work and your name should go with the image wherever it goes.

Click to enlarge the final image.

Step 20

Because we have made our image so large, now we can simply resize and reposition each part to make a wallpaper any resolution we want. For the sake of the tutorial I am going to make mine a Wide 1280×800.

Choose Image > Canvass Size and set the resolution to 1280×800 pixels. When it asks you about clipping just click ok.

Choose the very top layer, hold down Shift and then select all of the others except for the Background Layer. Use the Free Transform Tool and resize all the whole image to fit. Then its just a case of moving around each layer to fit the new resolution.

If you would like to see the video of me making this wallpaper you can view it at:

Thanks for taking the time to view this tutorial. Leave comments and feedback below. Don’t forget to upload your Photoshop pictures to our

LinkWithin

Related Posts Plugin for WordPress, Blogger...